Leaderboard


.thumb.png.94d7d78b5e008354fc28ad062d003d96.png)
Popular Content
Showing content with the highest reputation on 03/02/20 in all areas
-
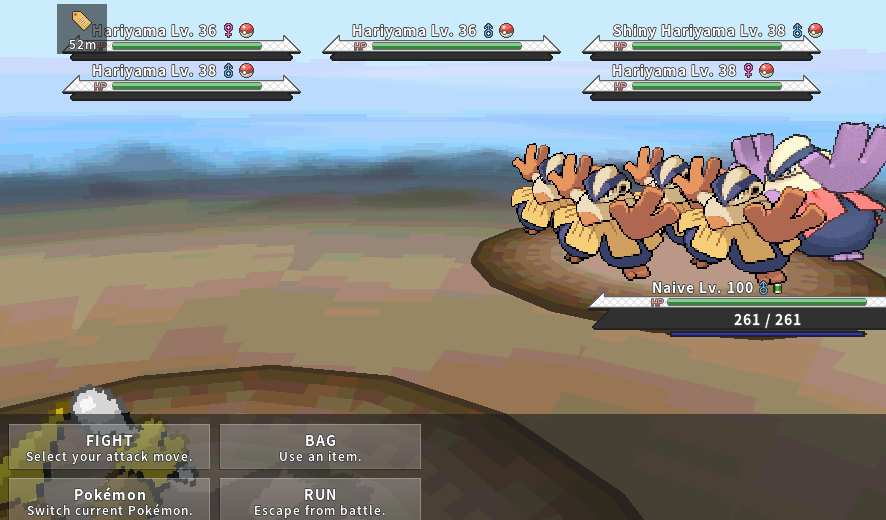
Found it (one with shocking stats ) while on a shiny link (5% boost) Thank you rukus for sharing the shiny charm with me.
 8 points
 -
Phase 2 searching shiny tynamo 94.818 encounters 73 OT Jonulo6 points
-
Harvesting All The Energy Nosepass and his friends are trying to harvest all the electromagnetic energy, come give them a hand! Date Friday, 6th March 2020 Time 14:00 ET // 19:00 UTC - Time Zone Converter Location Granite Cave (Rocks in bottom floor but Staff located on top floor), Hoenn, Channel 1 Duration 1 hour for catching another 10 minutes for players to submit entries Scoring Total Sum of IVs + Nature Bonus = Total Score Pokémon accepted as valid entries Nosepass +7 Geodude +3 Aron Makuhita Nature Bonus Calm +5 Impish +5 Modest +5 Rules To win 1st-3rd places that are sorted by high to low, you need to submit an entry that scores the highest To win 4th place you need to submit an entry that scores the lowest You can only submit one entry All Pokémon must be caught within the event time and at the event location All Pokémon must remain unchanged (untrained/unevolved...) Evolved or unevolved forms of the listed Pokémon will not be accepted as a valid entry You must be the OT of the Pokémon You must link your entry to any participating staff member via whisper to submit it In the event of a tie, the winner will be determined by earliest catch time Participating Staff Lin Teddi RevzSM 1st Place Prize SHINY GIFT Nosepass Your choice of nature, 2 moves with IVs 2x31 & 4x25 & 1,000 Reward Points 2nd Place Prize 500 Reward Points 3rd-4th Place Prize 250 Reward Points
 5 points
 -
Wow... @NagaHex FINALLY found his shiny Pikachu after 17.000 (yes, 17k) leppas! He has been hunting since October last year. He can finally rest. RIP.
 5 points
 -
People are often complaining that Mienfoo and Clamperl are a huge thread within LC. Where Mienfoo could be the issue due to U-Turn + Regenerator. The only pokemon that can switch in semi safely is Trubbish to contest a speed tie, Gastly can outspeed it but you'd need to predict pretty well for that. All other checks/ counters are slower than Mienfoo, giving it the opportunity to chip the poke a little with U-Turn, heal 6-8 health with Regenerator. Making it increasingly more difficult to wittle it down, not taking into consideration that Diglett/ Trapinch can come in and take care of the check/ counter of Mienfoo. From the top of my head only Grimer can handle Diglett, if the Grimer is Brave with Giga Drain and Shadow Sneak. Clamperl has it's specific item being Deepseatooth which can 1hk0 pretty much the entire tier after Stealth Rocks are up. Without Deepseatooth Clamperl can be considered a whole lot less threatening. Looking at the fact that complex bans are being considered in banning Arena Trap, considering Deepseatooth should be an option. At that point Eviolite Clamperl needs +4 spatk to run rampage, since +2 doesn't get many K0's. Gastly is a glass cannon, there are quite a hand full of pokemons that can naturally outspeed it. As for Arena Trap in general. It is a cheap way to kill pokemon without the opponent having many options to counteract the play. At the time of the Diglett test ban Trapinch took a huge rise in usage, this was arguable to fill the gap of Arena Trap. Diglett might still see usage without Arena Trap, Trapinch most likely very little. A test ban on Arena Trap for now to me sounds like a good step. Potentially following by a test ban of Deepseatooth.4 points
-
Thanks mate!! Im really happy now, 13/10/19 I start, 20/10 catch a Magnemite, 15/11 a Voltorb and today finally my Pikachu <3 22k Leppas, 17k since Voltorb. And now:4 points
-

Care To Stay For The Night? (Saturday, 7th March)
Goalinetsky and 2 others reacted to CommanderBlue for a topic
Care To Stay For The Night? >:D Date & Time Saturday, 7th March 2020 17:00 UTC - 17:00 GMT - 12:00 EST - 14:00 BRT Time Zone Converter Location Old Chateau, Sinnoh - Channel 1 Duration 1 hour for catching Another 10 minutes for players to submit entries Scoring Total Sum of IVs + Species Bonus + Nature Bonus = Total Score Pokemon accepted as valid entries: Gastly Rotom +10 Nature Bonus: Modest +5 Calm +3 Timid +3 First Place Prize GIFT Rotom Your choice of nature, 4 moves, with IVs 6x31 & 1,000 Reward Points Second Place Prize 700 Reward Points Third PlacePrize 300 Reward Points Rules To win this event you need to submit an entry that scores the highest. All Pokemon must have been caught within the event time. You will have one hour to catch your entry. Evolved or unevolved forms of the listed Pokemon will not be accepted as a valid entry. All Pokemon must remain unchanged (untrained/unevolved...). Pokemon must be the player's OT. You can only submit one entry. You must link your entry to any participating staff member via whisper to submit your entry. In the event of a tie, the winner will be determined through the earliest catch time. Participating Staff: CommanderBlue Raichuforyou RevzSM Lin Teddi 3 points
 -
Good thing Hydreigon doesn't learn Draco Meteor, dodged a bullet there3 points
-
It's almost harvesting season.3 points
-

[LC Discussion] Arena Trap
RLotus and one other reacted to DaftCoolio for a topic
Its worth considering the problem isn't arena trap but the sweepers themselves, specifically clamperl. Its odd to say that arena trap makes clamperl op when even without arena trap its still op. With little to no help it still beats tentacool and chinchou. Gastly is a touch easier, with a few fat boys around in porygon and lax as well as im sure a couple pursuiters but those will lose out to trapinch, they aren't as afraid of diglett. Foo is fairly manageable even now, with koffing, probably some ghost boys, budew, does foongus get regen yet? do people run zubat? i couldnt find usage anywhere blame munya. tldr; ban clamperl first, then suspect test trapinch, then suspect test diglett.2 points -

[LC Discussion] Arena Trap
Tonylov5 and one other reacted to LifeStyleNORE for a topic
More like just ban Arena Trap in every tier/format. And Shadow Tag too.2 points -
2 points
-

Vanity Suggestion Thread
kniLwodahS and one other reacted to Deviluke for a question
Item Slot: Hat Image of Item: I made the full suit but I might be the only one that likes it.
 2 points
 -

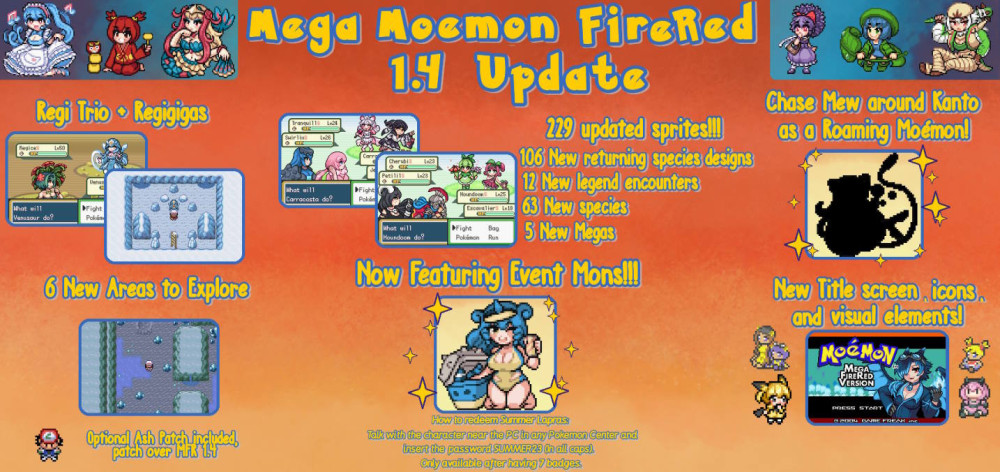
Mega Moemon Firered (1.4c), August2023
zinstar reacted to Septentrion for a topic
Mega Moémon FireRed Moemon Project Discord Community (agree to the rules) see baby bear, beware of mama Download Mega Moemon Firered Current(1.4c) Mega Moemon Firered is the most advance moemon game. It is specially curated to showcase the highest quality moemon sprite that exist while posing some gameplay challenges. There are many changed aspects include full gameplay changes such as Fairy Typing, double encounters, and MEGA EVOLUTION. MMFR Victory Survey - Hope to see you here when you are the Moemon League Champion. https://twitter.com/MoemonOfficial Updated Moemon Platinum & HeartGold/SoulSilver Moemon Black 2 & White 2 If you play the game on an OS other than Windows or Emulator that isn't VBA, you're the expert. Don't ask question that are answered by Google, pinned posts on Discord, announcements on Discord and readme.txts. Other Games Moemon Black and White All Gen 3 games Looking for the POKEMMO mod? Stuff for sprite artists: Sprite Collection Icon Collection How to Mega Evolve: 1: Have Mega Bracelet in your inventory 2. Give the Moemon the correct mega-stone 3. In battle select Attack, then press Start(whatever your key is) 4. Use a move Credits:

 1 point
 -

PokeMMO: Secret Base Basics
Buddhalicious reacted to Bestfriends for a topic
PokeMMO: Secret Base Basics Hello fellow citizens of PokeMMO, I hope you're enjoying your experience here so far. In the general discussions on forums, I saw a resurgence in questions about the Secret Base. Due to the amount of questions the community and staff receive often, I made this guide so if there are any more Secret Base questions, players can then be directed to this guide. As the Mayor of PokeMMO, I felt like it was my duty to make this guide. Without further ado, lets talk about the Secret Base locations and the shops that you can buy the decorations from. Basics: Types of Secret Bases: Secret Base Locations: There are 75 locations where Secret Bases Can Be Made Route Type Layout Location Free Dolls: Shops: Pretty Petal Flower Shop Fortree City Slateport City: Lilycove City Battle Frontier Shields As for the shields, you need to win at least 50 consecutive battles for the Silver Shield and 100 consecutive battles for the Gold Shield (this only applies to any activities inside the Hoenn Battle Frontier). -------------------------------------------------------------- As for the Pretty Chair (6,000 Steps) and Pretty Desk (8,000 Steps), you need Volcanic Ash in order to acquire this glass furniture. For more details on this, please visit this guide:1 point -

Sinnoh Gym Leader Rematches
FinnTheMember reacted to RedactedColour for a topic
The information stated in this section is mostly the same as my Kanto & Hoenn guides as well as Bestfriend's Unova and Morimoto guides. You can skip it if you've already read it. Formatting Species (Level #) Models provided by Bulbapedia Ability: ??? Item: ??? HP, Atk, Def, Sp. Atk, Sp. Def, Speed Damage based on health or deals a fixed amount, Damage based on Attack, Damage based on Special Attack, Non-damaging move All abilities, items, & moves have links to their respective Bulbapedia page. This is intended to make it easier for you to research. How the Data Was Collected Most people are just here for the data, so I'm putting the parts that are less important into spoilers. Fighters "How did you fight the gym leaders?" "What's the best team for the gyms?" "Is this a good Pokémon to use?" This is the team I used. Use your knowledge of basic match ups to decide who to throw into a fight. Additionally, @Bestfriends made this guide for battling the gym leaders. Using it, you should be able to farm them no problem. Redacted The Recon Team Redacted The Gym Leaders Everyone has five separate teams that they may draw from. In the 80 days it took me to complete my Kanto guide I found no discernible pattern as to which team gets thrown out. It doesn't seem to be affected by time of day, day of the week, Pokémon I start with, or any other factor. The only thing I can say for certain is that the gym leader won't change teams until you defeat their current team. With all that said, allow me to introduce the format for the Gym Leaders Species (Level #) Gifs provided by Bulbapedia Ability: --- Item: --- Speed the Pokemon is faster than <Speed< Speed the Pokemon is slower than Damage based on health or deals a fixed amount, Damage based on Attack, Damage based on Special Attack, Non-damaging move Moves in bold hit multiple Pokémon I have no way of knowing the stats of an opponent. All I can do is tell you whether they are faster than one of my own Pokemon or slower than another. "How do I use this guide?" The teams are organized based on what slot they are in the gym leader's party. For instance, Roark's first team has Tyranitar, Gigalith, & Aerodactyl. This means he'll open with Tyranitar & Gigalith (all gym rematches are double battles at the time of making this guide). This does not mean he'll throw in Aerodactyl after his first Pokemon has been defeated. If you look at the top left where you see his team members, it means the third ball will always contain Aerodactyl. Look at the gym leader you're battling. Look for the team that starts with the same Pokemon that they started with. If you're battling Roark & he started out with Tyranitar & Probopass then you're fighting Roark 3. The teams are placed in collapsible spoilers so that the guide will load faster & mobile users can scroll easier.
 1 point
 -
Honey Tree Mechanic and Locations
SamuraiMatt reacted to Bestfriends for a topic
Honey Tree Mechanic and Locations I hope that you're having a swell day. In the Sinnoh region, go outside and smell the fresh air! Perhaps, you would like a more "sweet" smell in game every time you encounter a yellow Honey Tree. If that is you, then this guide could make your day. While preparing my pokemon for taping Part 13 of the Sinnoh Walkthrough, @Terresa invited me to a Link with @Parke and @awkways. While the conversation was a bit on the comedic side, Terresa said "someone should make a Honey Tree guide." I did mention my other projects, but Terresa told me about the importance of such a guide. Once the offer was mentioned, I then promised the group that "after I complete the Sinnoh Walkthrough, this guide concept can be taken on." Make sure to thank these three players for purposing this guide request. Without further ado, let's dive straight into the information that you need to know about this activity. ----------------------------------- Mechanic Description: You can obtain Honey from the merchant at Floaroma Meadow for $750 per jar of Honey (check the location spoiler below this for location pictures). Once you obtain the Honey, then make sure to slather it onto a yellow Honey Tree and wait an hour from that time. After an hour, you can check back on the tree and it should shake in a fervent manor. As for the pokemon that you could encounter, I placed all the pokemon down in the Pokemon Spoiler. You can put multiple layers of Honey to attract more foes. Thank you @Edwardinho for explaining the Honey Layering mechanics to me. 1 Honey = 1 Pokemon 2 Honey = Double Battle 3 Honey = Triple Battle or Double Battle and later that one left, join a new pokemon. Extra Note: If you use a Pickup Pokemon while searching in Honey Trees, then you will have a small chance of picking up Berries per fight. I would like to credit @Minks for this discovery. Location Spoiler: Pokemon Spoiler: ----------------------------------- Tree Locations: Route 205 (North and South), Route 206, Route 207, Route 208, Route 209, Route 210 (North and South), Route 211 (East), Route 212 (North and South), Route 213, Route 214, Route 215, Route 218, Route 221, Route 222, Valley Windworks, Eterna Forrest (exterior), Fuego Ironworks, and Floaroma Meadow. Fun Fact: Surskit and Combee can also hold Honey. (I would like to thank @Dip for informing me about Surskit holding Honey)1 point -
PokeDex (PokeMMO Version)
Twashy reacted to Bestfriends for a topic
PokeDex (PokeMMO Version) Troubleshooting Credits: Thank you @LeZenor and @YIBU for trying to help me with this PokeDex Guide. Number 63 (abra) was giving me quite a bit of some trouble. As of the time of making this guide, I had to split pokemon data into sets of 25 pokemon per post with certain exceptions. Thank you @Deviluke for cleaning up the Guide's extra posts and @SecretDjinn for moving this guide to the Guide Tavern. Thank you @Rynner for your contribution to the Burmy→Wormadam wild location and evolution line. Thank you @JuliusMarch for showing me the Mobile "Find in Page" feature on the mobile devices. Thank you @ty76hj for giving us an early look into Johto Locations. I added them into the guide. Hello, welcome to the PokeDex Guide for PokeMMO! People asked me where to catch certain pokemon for their Dex, so I decided to make a guide to refer people to (not to mention, you also need to at least see all the pokemon in the Sinnoh Dex in order to be given the National Dex in game which can let you access areas that would of been gated off otherwise). This guide would like to make life easier for those who either need to document a certain pokemon or for a Breeder who would like to have quick hand knowledge of what Egg Group a pokemon is in. Here is how I plan on applying the information: Ie: -------------------------------------------------- Beta Concept: 304. Pokemon (Egg Group) New Concept: I would like to thank @YIBU for consulting me on a better way to document the Dex information. So now this Dex project is a joint venture! - 2/25/2020 Also, thank you @JuliusMarch for showing me the search option on mobile devices! - 4/22/2021 Note: The exterior will remain the same, but the interior (or the Spoiler of the Guide) is going to be quite different. -------------------------------------------------- To make life a bit easier, I would like to list all the Egg Groups so you can copy and paste them into your CNTL + F search tool on laptop or if you are on mobile, copy the egg group in your clipboard and click on the three dots to the top right of your device, then click on "Find In Page": Monster Water A Bug Flying Field Fairy Plant Humanoid Mineral Water C Chaos Water B Ditto Dragon Cannot Breed Genderless Note: Pokemon in the "Genderless" Egg Groups can breed with themselves as long as they are in the same evolution line like Metang and Metagross. I wish everyone well with their Dex Completion or Breeding Projects. For anyone that wants more detail on how to Breed here on PokeMMO, then you can either check out the Guide version of the process or my self help video that I made with @Lin about the topic. If you would like to see a list of Pokemon based upon their respective Egg Group, then feel free to check out the Pokemon Egg Group Index (PokeMMO Version). Feel free to check out the ItemDex Guide for the available item list for a pokemon and Egg Moves for certain Pokemon can be listed in the Egg Move Index Guide. If you would like to know Swarm information, then you can check out the Swarms in PokeMMO Guide (2nd Edition). If you would like to know the different Phenomenon Locations and Types, then feel free to check out @MightyBoxer's Phenomenon Locations Guide. If you would like to know the mechanics of Lures and Pokemon Lure Locations, then feel free to check out @MustangCZ's Lure Guide. If you would like to know more about Shaymin, then feel free to check out @Edwardinho's Shaymin Guide. If you would like to know more about Suicune, Raikou, and Entei, then feel free to check out @Damian's Legendary Beasts FAQ. If you would like to know more about all the Legendaries, then feel free to check out @Amitai's Completing the PokeDex: Legendary Pokemon Guide. If you would like to see only the Encounters in each route, then feel free to check out the Pokemon Encounters for PokeMMO Guide. If you would like to see the Experience Types for each Pokemon listed, then I have a Pokemon Experience Level Index for PokeMMO. For an entire list of all the Abilities and what Pokemon can have them, then feel free to check out the PokeMMO Ability Index. For an entire list of the Pokemon's Base Stats, then feel free to check out the Pokemon Base Stat Index for PokeMMO. For an entire list of all the Pokemon Evolutions, then feel free to check out the Pokemon Evolution Index for PokeMMO. For a list of some useful Items a wild pokemon could hold, then feel free to check out my PokeMMO Item Dex (2nd Edition) Guide.1 point -
The Art of Collecting Volcanic Ash
Turqueso reacted to Bestfriends for a topic
The Art of Collecting Volcanic Ash Some people may not know about this activity, so I am asked about my "glass desk in my secret base." I tell them about the Pretty desk and how to obtain it. This idea sparked a guide about this very topic. I was planning for a year about how I can approach this topic and I did it. So, I am going to provide the Ash information down below. After you have read this guide, you can become familiar with the crafting process as a whole. Here are some fundamental questions about this activity that I am going to discuss.... 1. What is a Soot Sack? 2. How do I collect the ash? 3. How do exchange the ash for prizes? 4. Speaking about prizes, what can I get? 5. How much ash can I get from each "section?" 6. Can I use repel and if not, what is an alternative to this? Figure A Figure B -------------------------------------------------------------------------------------------- Question 1) What is a Soot Sack? Answer: Its a key item used to collect ash. You obtain it if you go to Route 113 and to the house shown in Figure A and talk the guy in Figure B. You can "Use" the Soot Sack item to count the amount of ash you have.... Here is Bulbapedia's definition: ---------------------------------------------------------------------- Question 2) How do I collect the ash? Answer: If you see a "puff" ( or ), then you can collect ash from it. One puff is equivalent to one step in ash. Question 3) How do exchange the ash for prizes? Answer: Go to the house shown in Figure A on Route 113 and then talk to the guy you got your Soot Sack from (Figure B). Question 4) Speaking about prizes, what can I get? Answer: Here is a list courtesy of Bulbapedia: Question 5) How much ash can I get from each "section?" Answer: Here is the maps. (I did a lot of trial and error to get to these numbers) Route 113: Jagged Pass: 6. Can I use repel and if not, what is an alternative to this? Answer: You are not allowed to use repel, but you are allowed to carry a level 100 Muk with the Stench ability or a level 100 Torkoal with the White Smoke ability. Answer 2: You can also hold a Cleanse Tag which can help to repel encounters while collecting ash. ----------------------------------------------------------------------------------------- Figure A Figure B1 point -
Finding Every Move (2nd Edition)
ryumi reacted to Bestfriends for a topic
Finding Every Move (2nd Edition) Before you read this guide, I would like to thank @KaynineXL for his trust in me to restore his Finding Every Move Guide. Feel free to check out the First Edition of this guide. Other Useful Links: Bestfriends - All TM & HM Locations KaynineXL - Community Pickup Guide! (Find Tutor items!) MightyBoxer - [Storyline guide] Kanto Hoenn Sinnoh Unova complete walkthrough (all items + hidden items) Tip:Use 'Ctrl + F' to search for the move you need. *Note: Veilstone City's Department Store 3rd Floor in Sinnoh and Route 9's Shopping Mall NIne in Unova have all the available TMs. TM Market Locations Roar - Slateport / Vermilion / Eterna City / Nimbasa - 25k Hail - Slateport / Vermilion / Eterna City / Nimbasa - 10k Protect - Slateport / Vermilion / Eterna City / Nimbasa - 25k Safeguard - Slateport / Vermilion / Eterna City / Nimbasa - 12.5k Frustration - Slateport / Vermilion / Eterna City / Nimbasa - 17.5k Dig - Slateport / Vermilion / Eterna City / Nimbasa - 10k Brick Break - Slateport / Vermilion / Eterna City / Nimbasa - 17.5k Double Team - Slateport / Vermilion / Eterna City / Nimbasa - 10k Sandstorm - Slateport / Vermilion / Eterna City / Nimbasa - 10k Rock Tomb - Slateport / Vermilion / Eterna City / Nimbasa - 12.5k Aerial Ace - Slateport / Vermilion Eterna City / Nimbasa - 12.5k Attract - Slateport / Vermilion / Eterna City / Nimbasa - 10k Thief - Slateport / Vermilion / Eterna City / Nimbasa - 10k Flame Charge - Slateport / Vermilion / Eterna City / Nimbasa - 17.5k Incinerate - Slateport / Vermilion / Eterna City / Nimbasa - 10k Round - Slateport / Vermilion / Eterna City / Nimbasa - 10k Echoed Voice - Slateport / Vermilion / Eterna City / Nimbasa - 10k False Swipe - Slateport / Vermilion / Eterna City / Nimbasa - 10k Work Up - Slateport / Vermilion / Eterna City / Nimbasa - 17.5k Struggle Bug - Slateport / Vermilion / Eterna City / Nimbasa - 12.5k Bulldoze - Slateport / Vermilion / Eterna City / Nimbasa - 12.5k Sky Drop - Slateport / Vermilion / Eterna City / Nimbasa - 12.5k Pluck - Slateport / Vermilion / Eterna City / Nimbasa - 12.5k Low Sweep - Slateport / Vermilion / Eterna City / Nimbasa - 17.5k Hone Claws - Slateport / Vermilion / Eterna City / Nimbasa - 17.5k Fling - Slateport / Vermilion / Eterna City / Nimbasa - 12.5k Snarl - Slateport / Vermilion / Eterna City / Nimbasa - 12.5k Telekinesis - Slateport / Vermilion / Eterna City / Nimbasa - 10k Dream Eater - Slateport / Vermilion / Eterna City / Nimbasa - 10k Smack Down - Slateport / Vermilion / Eterna City / Nimbasa - 12.5k Hyper Beam - Fortree / Saffron / Pastoria / Mistralton - 17.5k Hidden Power - Fortree / Saffron / Pastoria / Mistralton / Celadon Game Corner - 6000 coins / 30k Sunny Day - Fortree / Saffron / Pastoria / Mistralton - 25k Taunt - Fortree / Saffron / Pastoria / Mistralton - 17.5k Solarbeam - Fortree / Saffron / Pastoria / Mistralton - 17.5k Rain Dance - Fortree / Saffron / Pastoria / Mistralton - 17.5k Torment - Fortree / Saffron / Pastoria / Mistralton - 12.5k Facade - Fortree / Saffron / Pastoria / Mistralton - 17.5k Rest - Fortree / Saffron / Pastoria / Mistralton - 25k Overheat - Fortree / Saffron / Pastoria / Mistralton - 20k Grass Knot - Fortree / Saffron / Pastoria / Mistralton - 25k Explosion - Fortree / Saffron / Pastoria / Mistralton - 17.5k Retaliate - Fortree / Saffron / Pastoria / Mistralton - 12.5k Giga Impact - Fortree / Saffron / Pastoria / Mistralton - 17.5k Psych Up - Fortree / Saffron / Pastoria / Mistralton - 12.5k Swagger - Fortree / Saffron / Pastoria / Mistralton - 12.5k X-Scissor - Fortree / Saffron / Pastoria / Mistralton - 17.5k Charge Beam - Fortree / Saffron / Pastoria / Mistralton - 12.5k Acrobatics - Fortree / Saffron / Pastoria / Mistralton - 17.5k Frost Breath - Fortree / Saffron / Pastoria / Mistralton - 17.5k Dragon Tail - Fortree / Saffron / Pastoria / Mistralton - 17.5k Shadow Claw - Fortree / Saffron / Pastoria / Mistralton - 17.5k Quash - Fortree / Saffron / Pastoria / Mistralton - 12.5k Embargo - Fortree / Saffron / Pastoria / Mistralton - 10k Payback - Fortree / Saffron / Pastoria / Mistralton - 17.5k Ally Switch - Fortree / Saffron / Pastoria / Mistralton - 10k Venoshock - Fortree / Saffron / Pastoria / Mistralton - 12.5k Poison Jab - Fortree / Saffron / Pastoria / Mistralton - 17.5k Rock Polish - Fortree / Saffron / Pastoria / Mistralton - 17.5k Rock Slide - Fortree / Saffron / Pastoria / Mistralton - 17.5k Gyro Ball - Fortree / Saffron / Pastoria / Mistralton - 25k Focus Punch - Lilycove Department Store / Celadon Department Store / Veilstone Department Store / Shopping Mall Nine (Unova) - 17.5k Shock Wave - Lilycove Department Store / Celadon Department Store / Veilstone Department Store / Shopping Mall Nine (Unova) - 10k Water Pulse - Lilycove Department Store / Celadon Department Store / Veilstone Department Store / Shopping Mall Nine (Unova) - 10k Bullet Seed - Lilycove Department Store / Celadon Department Store / Veilstone Department Store / Shopping Mall Nine (Unova) - 20k Giga Drain - Lilycove Department Store / Celadon Department Store / Veilstone Department Store / Shopping Mall Nine (Unova) - 25k Iron Tail - Lilycove Department Store / Celadon Department Store / Veilstone Department Store / Shopping Mall Nine (Unova) - 17.5k Secret Power -Lilycove Department Store / Celadon Department Store / Veilstone Department Store / Shopping Mall Nine (Unova) - 10k Steel Wing - Lilycove Department Store / Celadon Department Store / Veilstone Department Store / Shopping Mall Nine (Unova) - 12.5k Skill Swap - Lilycove Department Store / Celadon Department Store / Veilstone Department Store / Shopping Mall Nine (Unova) - 12.5k Snatch - Lilycove Department Store / Celadon Department Store / Veilstone Department Store / Shopping Mall Nine (Unova) - 12.5k Dragon Claw - Sootopolis / Cinnabar Island / Sunyshore / Icirrus - 22.5k Calm Mind - Sootopolis / Cinnabar Island / Sunyshore / Icirrus - 25k Toxic - Sootopolis / Cinnabar Island / Sunyshore / Icirrus - 25k Bulk Up - Sootopolis / Cinnabar Island / Sunyshore / Icirrus - 17.5k Ice Beam - Sootopolis / Cinnabar Island / Sunyshore / Icirrus / Game Corners (Mauville & Celadon) - 6000 coins / 30k Blizzard - Sootopolis / Cinnabar Island / Sunyshore / Icirrus - 17.5k Light Screen - Sootopolis / Cinnabar Island / Sunyshore / Icirrus - 17.5k Flamethrower - Sootopolis / Cinnabar Island / Sunyshore / Icirrus / Game Corners (Mauville & Celadon) - 6000 coins / 30k Thunderbolt - Sootopolis / Cinnabar Island / Sunyshore / Icirrus / Game Corners (Mauville & Celadon) - 6000 coins / 30k Thunder - Sootopolis / Cinnabar Island / Sunyshore / Icirrus - 20k Earthquake - Sootopolis / Cinnabar Island / Sunyshore / Icirrus - 30k Return - Sootopolis / Cinnabar Island / Sunyshore / Icirrus - 25k Psychic - Sootopolis / Cinnabar Island / Sunyshore / Icirrus - 25k Shadow Ball - Sootopolis / Cinnabar Island / Sunyshore / Icirrus - 25k Reflect - Sootopolis / Cinnabar Island / Sunyshore / Icirrus - 17.5k Sludge Bomb - Sootopolis / Cinnabar Island / Sunyshore / Icirrus - 25k Fire Blast - Sootopolis / Cinnabar Island / Sunyshore / Icirrus - 30k Energy Ball - Sootopolis / Cinnabar Island / Sunyshore / Icirrus - 25k Will-O-Wisp - Sootopolis / Cinnabar Island / Sunyshore / Icirrus - 25k Scald - Sootopolis / Cinnabar Island / Sunyshore / Icirrus - 30k Swords Dance - Sootopolis / Cinnabar Island / Sunyshore / Icirrus - 30k Substitute - Sootopolis / Cinnabar Island / Sunyshore / Icirrus - 30k U-Turn - Sootopolis / Cinnabar Island / Sunyshore / Icirrus - 30k Volt Switch - Sootopolis / Cinnabar Island / Sunyshore / Icirrus - 30k Thunder Wave - Sootopolis / Cinnabar Island / Sunyshore / Icirrus - 30k Wild Charge - Sootopolis / Cinnabar Island / Sunyshore / Icirrus - 20k Focus Blast - Sootopolis / Cinnabar Island / Sunyshore / Icirrus - 25k Psyshock - Sootopolis / Cinnabar Island / Sunyshore / Icirrus - 25k Trick Room - Sootopolis / Cinnabar Island / Sunyshore / Icirrus- 20k Sludge Wave - Sootopolis / Cinnabar Island / Sunyshore / Icirrus - 25k Stone Edge - Sootopolis / Cinnabar Island / Sunyshore / Icirrus - 30k Flash Cannon - Sootopolis / Cinnabar Island / Sunyshore / Icirrus - 25k Flash - Nimbasa / Veilstone Department Store (Female Merchant) / Shopping Mall Nine - 2.5k Rock Smash - Nimbasa / Veilstone Department Store (Male Merchant) / Shopping Male Nine - 2.5k Roost - Veilstone Department Store (Male Merchant) / Shopping Mall Nine - 20k Avalanche - Veilstone Department Store (Male Merchant) / Shopping Mall Nine - 30k Drain Punch - Veilstone Department Store (Male Merchant) / Shopping Mall Nine - 30k Dark Pulse - Veilstone Department Store (Male Merchant) / Shopping Mall Nine - 30k Stealth Rock - Veilstone Department Store (Male Merchant) / Shopping Mall Nine - 20k Brine - Veilstone Department Store (Female Merchant) / Shopping Mall Nine - 30k Recycle - Veilstone Department Store (Female Merchant) / Shopping Mall Nine - 10k Captivate - Veilstone Department Store (Female Merchant) / Shopping Mall Nine - 15k Natural Gift - Veilstone Department Store (Female Merchant) / Shopping Mall Nine - 20k Nature Power - Veilstone Department Store (Female Merchant) / Shopping Mall Nine- 17.5k Sleep Talk - Veilstone Department Store (Female Merchant) / Shopping Mall Nine - 10k Endure - Veilstone Department Store (Female Merchant) / Shopping Mall Nine - 20k Silver Wind - Veilstone Department Store (Female Merchant) / Shopping Mall Nine - 30k Leech Life - Veilstone Department Store (Female Merchant) / Shopping Mall Nine - 20k Shard Tutor Guide Red shards: Kanto: Tutor's location: 7 Island, Tanoby Ruins (at the left). Sinnoh: Survival Area Shard's location: (Super Rod: Vermillion City. Cinnabar island, Route 128 & Ever Grande City). Move's cost: Super fang : 3 Red Shard(s) Mud-slap 1 Red Shard(s) Ancientpower : 3 Red Shard(s) Outrage : 3 Red Shard(s) Fire punch 3 Red Shard(s) Uproar : 2 Red Shard(s) Twister : 1 Red Shard(s) Selfdestruct : 2 Red Shard(s) Air cutter : 2 Red Shard(s) Iron tail : 3 Red Shard(s) Heat wave : 3 Red Shard(s) Sky attack : 3 Red Shard(s) Covet : 2 Red Shard(s) Blue shards: Kanto: Tutor's location: north of 6 Island. Sinnoh: Route 212 Shard's location: (underwater). Move's cost: Snatch: 2 Blue Shard(s) Skill swap : 2 Blue Shard(s) Hyper voice : 2 Blue Shard(s) Magic coat : 3 Blue Shard(s) Dive : 3 Blue Shard(s) Signal beam : 3 Blue Shard(s) Spite : 1 Blue Shard(s) Trick : 2 Blue Shard(s) Endeavor : 3 Blue Shard(s) Icy Wind : 3 Blue Shard(s) Snore 1 Blue Shard(s) Swift 2 Blue Shard(s) Psych up 3 Blue Shard(s) Nightmare 3 Blue Shard(s) Ice punch 3 Blue Shard(s) String shot : 1 Blue Shard(s) Role play : 2 Blue Shard(s) Green shards: Kanto: Tutor's location: 5 Island, Memorial Pillar (south). Shard's location: (underwater and at night in Tanoby Ruins with super rod). Move's cost: Synthesis : 3 Green Shard(s) Pain split : 3 Green Shard(s) Heal bell : 3 Green Shard(s) Defense curl 1 Green Shard(s) Iron Defense : 3 Green Shard(s) Recycle : 2 Green Shard(s) Helping hand : 1 Green Shard(s) Yellow shards: Kanto: Tutor's location: 1 island (north). Sinnoh: Snowpoint City Shard's location: & (they are both underwater). Move's cost: Bind : 1 Yellow Shard(s) Bounce : 2 Yellow Shard(s) Headbutt : 5 Yellow Shard(s) Knock off : 2 Yellow Shard(s) Endure 3 Yellow Shard(s) Low kick : 2 Yellow Shard(s) Block : 2 Yellow Shard(s) Superpower : 3 Yellow Shard(s) Thunderpunch : 3 Yellow Shard(s)1 point -

[WesleySafadaooo] SafaTour NU #01 (Sábado, 21 de Março de 2020)
LipeHaru reacted to WesleySafadaooo for a topic
SafaTour NU #01 [NU] Afim de movimentar o cenário competitivo da Team e treinarmos na Tier NU, que é uma das menos jogadas, e de difícil treino no Matchmaking contra os times OU, começa a partir deste fim de semana o SafaTour, torneio que será quinzenal (a cada 15 dias), sempre aos Sábados. O Torneio consistirá de eliminação simples, com a Final em Melhor de Três (o primeiro que vencer duas partidas é sagrado campeão). É permitido aos dois finalistas trocarem os times entre os jogos, caso queiram. Sempre haverá um Pokémon da Tier como premiação, a fim de estimular o Breed de times para a Tier. Detalhes Tournament | Single Battle | 2 Players | 6v6 (NU) Data Sábado, 21 de Março de 2020 Horário 16:00 BRT (Time Zone Converter) Local Ilha 2, Kanto, Channel 4 Inscrições Gratuitas! (Mandar mail para WesleySafadaooo) Clauses Evasion / Sleep / OHKO / Unique Species / Self-KO / OP Item Tournament Clauses Explained Ban List (Lista de Pokémon banidos) Para saber em qual "Tier" está cada Pokémon, use a PokéDex dentro do jogo, ela possui a funcionalidade de listar os Pokémon de acordo com a "Tier" em que se encontram. Todo e qualquer Pokémon listado na tier UU (ou acima) está banido! Banned Moves (Movimentos Banidos) Informações gerais a respeito do evento Prêmio de 1º Lugar $ 100,000 Pokeyen + Aipom 3x31 Jolly Prêmio de 2º lugar $ 50,000 Pokeyen Prêmio de 3º lugar $ 25,000 Pokeyen Organizador(es) do evento: WesleySafadaooo Bracket: https://challonge.com/safatour_nu_1
 1 point
 -
Balancing Added early badge scaling for Sinnoh's common trainers (Badges 5~8) Various items in Sinnoh are now marked as untradeable when obtained through the storyline / common NPCs Added another prize exchange NPC in Veilstone City Bug Fixes Fixed items not consuming properly in PvP Fixed a battle crash which could have occurred with Sky Drop Fixed an issue where follower mods could corrupt overworld swarm spawn's sprites Fixed several incorrectly assigned TM moves (e.g. Heal Bell on Poochyena). These are now properly assigned to Tutors again. Fixed Eject Button trying to play the last queued action after triggering Possible fix for Spectating / Running not cancelling SFX correctly (most prominently seen with the Black Hole particle fx) Fixed battle replays requiring players to move before they could watch another Fixed various issues with "On Evolution" move blocks Fixed several missing moves Silcoons/Beautifly with the incorrect move "False Swipe" have been patched, and the move removed from them Fixed Honey Tree levels shown in the Dex GTL searches should now be less prone to getting stuck with "Loading.." Abra/Porygon trade gifts are no longer given in Sinnoh's storyline PokeMMO's distributed JRE was updated to j8u2421 point
-
Ban arena trap or diglett, LC will be healthier for sure.1 point
-
This is probably not a huge distinction, but keep in mind that banning deepseatooth or banning arena trap is not a complex ban. It's only a complex ban when you ban it on certain pokemon (like, for example, banning draco meteor on hydreigon)1 point
-
I don’t disagree that they play a larger part in the LC meta, but my point is that they’re still uncompetitive regardless of the tier/format1 point
-
Damn, this was definitely a x5 horde when i first made the guide (rip indeed). I will correct it right away. Thank you very much for confirming with screenshot. It's very much appreciated!1 point
-
Sinnoh Gym Leader Rematches
Diplomacy reacted to RedactedColour for a topic
Thank you. I'll be starting Byron pretty soon now that I have the first three gyms fully documented. I'll keep an eye out.1 point -
Stranded (Sunday, 1st March)
yhozelinjuarez reacted to CommanderBlue for a topic
Stranded Date & Time Sunday, 1st March 2020 21:00 UTC - 21:00 GMT - 16:00 EST - 18:00 BRT Time Zone Converter Location Pacifidlog Town, Hoenn - Channel 1 Duration 1 hour for catching Another 10 minutes for players to submit entries Scoring Total Sum of IVs + Species Bonus + Nature Bonus = Total Score Pokemon accepted as valid entries: Pelipper Tentacruel +3 Nature Bonus: Timid +5 Calm +3 First Place Prize GIFT Tentacruel Your choice of nature, 4 moves with IVs 6x31 & 1,000 Reward Points Second Place Prize 700 Reward Points Third PlacePrize 300 Reward Points Rules To win this event you need to submit an entry that scores the highest. All Pokemon must have been caught within the event time. You will have one hour to catch your entry. Evolved or unevolved forms of the listed Pokemon will not be accepted as a valid entry. All Pokemon must remain unchanged (untrained/unevolved...). Pokemon must be the player's OT. You can only submit one entry. You must link your entry to any participating staff member via whisper to submit your entry. In the event of a tie, the winner will be determined through the earliest catch time. Participating Staff: CommanderBlue MPDH LeZenor 1 point
 -
well better then my pichu ;_:1 point
-
1 point
-
We're saving them for dungeons.1 point
-
游戏id:GuaPizzz (*╹▽╹*)接下来分享三个海星的配置—— 戏法型工兵海星 道具:后攻之尾/附着针 努力:252hp-52def-204spe 性格:胆小 配招: -热水/冲浪/水炮 -高速旋转 -戏法 -冰冻光束/精神强念/十万伏特(攻)/电磁波/剧毒(为队友开路) 配置分析:配置隐蔽性很高的海星,在我之前使用它的时候经常用它坑到很多初出茅庐经验缺失的小萌新。胆小204速度过了108极速的速度线,252的hp保证耐久,剩下的分配到特攻强化输出。配招的选择:热水冲浪水炮三个本系,热水强调hax,脸黑请自行斟酌,冲浪90威力稳定输出,水炮则是高风险高回报;高速旋转客串清钉手,扫地辅助队友上场;戏法是这里最阴险的配招,当你携带后攻之尾,出手比对手慢,对手以为你海星并没有拉多少速度,自然而然以为你是一只受向的海星,此时只需要一个戏法,对手的高速就能被封的死死的,不管强化了多少速度,永远比我方慢出手【备注:后攻之尾效果——携带者优先度-0.5。】。剩下一个格子可以选择攻向的冰光,精干和十万,分别压血地龙,老匠和暴鲤龙,也可以选择电磁波、剧毒,给对手上状态恶心。 骚扰型打工仔海星 道具:讲究围巾/讲究眼镜/后攻之尾/附着针 努力:252hp-4def-252spe 性格:胆小 配招: -电磁波/剧毒 -戏法 -热水/水炮 -高速旋转 配置分析:究极打工仔海星,全程帮助队友打工,通过不断给对手以骚扰,附加各种状态来帮助队友更好地突破对手。电磁波可以用来辅助飞机,限制对手的高速pm,剧毒可以限制对手的强化和炮台,热水和水炮一个注重于提供烧伤的状态,一个是高威力压血技能,高旋清钉子帮助打手上场。戏法,破受神器,围巾眼镜压死一众盾牌,后攻之尾同样可以用来辅助飞机限制对手速度,附着针则是消耗对手血量的神器,有效磨血。努力值全部分配在hp和速度是因为尽可能多给海星耐久的同时还要保持住海星自身的高速优势,先手戏法讲究类道具可以很轻松地过掉原本让人很头疼的蝶舞火神蛾,龙舞暴鲤龙等一众强化型选手,同时还有可能蹭到它们携带的剩饭。 又把上面都看了一眼,好像还没人写三攻一变的海星?要不我把它补了233 三攻一变海星 道具:生命宝珠 努力:252def-4spd-252spe 性格:胆小 配招: -冲浪/水炮 -十万伏特/冰冻光束 -精神强念/精神冲击 -自我再生 配置分析:纯输出型的海星,115的高速和不俗的输出给了它输出的资本,丰富的技能池给了它配置的隐蔽性和打击面的丰富性,水电超或者水冰超都能组成非常不错的打击面,唯一遗憾的可能就是输出的力度尚有不足吧,因此在道具方面选择了命玉加大打击的力度。最后一个格子携带了自我再生,可趁对手想vs/ut的时候点回血保证站场的续航能力。 一觉醒来配置被师父写的差不多了= =233 觉得有帮助的记得点个赞啊啊啊啊啊啊啊呜呜呜1 point
-

Team Tournament February 2020 (Saturday 29th)
Kamowanthere reacted to kloneman for a topic
1v1 Silph Co ch 4, Tauros only1 point -

Team Tournament February 2020 (Saturday 29th)
Kamowanthere reacted to Spxter for a topic
next time spend 1min less with ya gf help a bro out 1v1 klone1 point -
Team Tournament February 2020 (Saturday 29th)
Kamowanthere reacted to kloneman for a topic
I give Spxter one job and this happens smh1 point -
^ Non shiny prizes worth competing. Not giving names but some people should learn from this :))1 point
-

[Unofficial] Shiny Existence Thread [5th Life]
Mookynesis reacted to EmmaCACHJ for a topic
9 OT1 point -

[MOD] HD Battle Sprites -Front and back-
2521988492 reacted to ATwind for a topic
After I import it, it's floating.jpg.fcc6614a3450df2b442a8cfb8a29e984.jpg) 1 point
1 point -
Unova 10xHP - Amoonguss @Route 10 10xATK - Bouffalant @Route 10 10xDEF - Pelipper @Undella Bay 10xSATK - Golduck @Route 11 10xSDEF - Mantine @Undella Town 10xSPEED - Rapidash @Route 12 Ctrl + F to search Route 1 x5 Watchog 10ATK Route 3 x3 Pidove Blitzel Purrloin (Night) Route 4 x3 Darumaka Frillish x5 Route 5 x3 Minccino Liepard Route 6 x3 Karrablast Deerling Tranquill x5 10ATK Route 7 x5 Watchog 10ATK Zebstrika ??? Route 8 x5 Palpitoad 10HP Stunfisk 10HP Route 9 x5 Duosion 10SATK Gothorita 10SDEF Route 10 x5 Bouffalant 10ATK Amoonguss 10HP Herdier @Badge-check-gates 10ATK Route 11 x5 (Waterfall) Golduck 10SATK Gligar Amoonguss Buizel Route 12 x5 Rapidash 10SPEED Tranquill 10ATK Route 13 x5 Swellow (Day/Morning) Solrock (Day/Morning) Lunatone (Night) Drifblim (Night) Route 14 x5 Beheeyem 10SATK Jigglypuff 10HP Buizel Route 15 x5 Sawk Throh Marowak Fearow 10SPEED Route 16 x3 Solosis Gothita Trubbish Minccino Route 17 x5 Frillish Route 18 x5 Throh (Day/Morning) Sawk (Day/Morning) Scraggy Crustle Frillish Abundant Shrine x5 Bronzong Vulpix Stantler Slowpoke Celestial Tower x5 Litwick F1 Elgyem F2 Challenger's Cave x5 Lickitung F1 10HP Boldore B1 10DEF Graveler B2 Sableye B2 Mawile B2 Chargestone Cave x5 Klink F1 Ferroseed B1 Joltik B1 B2 Tynamo B2 Cold Storage x5 Herdier x3 Vanillite Timburr Desert Resort x3 Sandile Entrance Darumaka Sigilyph Maractus (Night) Dragonspiral Tower x5 Deerling Mienfoo Sawsbuck (Winter) Beartic (Winter) Vanillite (Winter) Druddigon F1 10ATK Golett F2 Dragonspiral Tower (pre area) Mienfoo/Vanillite (Winter) Vanillish (Winter) Dreamyard x5 Liepard Raticate B1 Kricketune B1 (Night/Morning) Driftveil City x5 Frillish Giant Chasm x5 Golbat Entrance 10SPEED Tangela Entrance Sneasel Piloswine Seel Piloswine (North of the cave) 5ATK 5DEF Solrock (Day/Morning) Lunatone (Night/Morning) Guidance Chamber x5 (Mistralton Cave 2nd floor) Flash Woobat Axew Icirrus City x5 Shelmet (Winter) Stunfisk Lostlorn Forest x3 Venipede Night Cottonee (Day/Morning) Petilil (Day/Morning) Zorua Swadloon x5 (Waterfall) 10DEF Mistralton Cave x5 Boldore Woobat Moor of Icirrus x5 Palpitoad 10HP Stunfisk 10HP P2 Laboratory x5 Herdier 10ATK Frillish Pinwheel Forest x3 Tympole Entrance Timburr Entrance Pidove (Day/Morning) Sewaddle (Day/Morning) Venipede (Night) Whirlipede (Night) Cottonee (DayMorning) Petilil (Day/Morning) Relic Castle x5 Yamask x3 F1 B1 Sandile x3 F1 B1 Cofagrigus B2 10DEF Krokorok B4 10ATK Sandslash B5 Onix B5 Claydol B5 Volcarona Room 10SDEF Twist Mountain x5 Gurdurr Route 7 Entrance 10ATK Boldore Woobat Cubchoo B3 F1 F2 B3 (Winter) Cryogonal B3 (Winter) Undella Town x5 Mantine 10SDEF Victory Road x5 Heatmor Outside 10SATK Boldore Deino/Durant South Entrance Deino/Mienfoo F1 East Room Mienfoo 3F Middle Room Woobat 4F Middle Room Village Bridge x5 Vullaby Rufflet (Day/Morning) Bibarel (Night) Bibarel Wellspring Cave x5 Boldore B1 Woobat B11 point
-
Sinnoh Gym Leader Rematches
Branaso reacted to RedactedColour for a topic
Additional Information Do I get more money for fighting one team as opposed to another? No. All gym leaders will give the exact same amount of Poké regardless of which of their teams you defeat. Different gym leaders, however, will give different amounts. What's the difference between a Pokémon with ??? for their item or ability as opposed to --- or an actual item or ability? --- means that the Pokémon doesn't have an item. A Pokémon with ??? for its Ability, item, or move has an unknown Ability, item, or move. Why do some gym leaders have different coloured names? Grey means I haven't documented that team yet. Red means I don't have the items recorded. Blue means I have the items recorded but not all the abilities. Green means I have the abilities and items recorded but not the moves. Black means I have everything recorded. You've made a mistake. (Pokémon) can't learn (move). Some Pokémon have moves that they shouldn't be able to learn according to their Gen 7 learnset on Bulbapedia. If I have a move listed it is because I've seen it or Eve has copied it. You've made a grammatical or spelling error. Thank you. Please tell me where it is so that I can fix it. I'm the type of person who corrects other people's grammar or spelling so I'd like this guide to be as error free as possible. Can't you just assume that a Pokémon has the same speed, Ability, or move across different teams for the same leader? I have observed that different teams from the same leader may have slightly different movesets, items, & abilities even if they have the same Pokémon. How long did it take to make this guide? As of March 29 2020, the guide is complete. It took 51 days to document all teams. How much did it cost to make this guide? 0 Poké. I've used no items and if someone fainted, I restarted the battle. What inspired you to make this? Procrastination. If you have all the tools you need then why post the guide before it's completed? It's easier to update as I go along than to keep all the information to myself and then post it. What was the most difficult part of making the guide? Fighting gyms often one hit K.O. Eve so I have to use methods to weaken the opposing team without defeating them or letting them switch out. Aside from that, it's pretty easy to document. Will there be a guide for other regions? I've already made one for Kanto & one for Hoenn. @Bestfriends has made a Unova guide and a Morimoto guide. Will you make an Elite Four rematch guide? Yes, but due to recent changes it will most likely be discontinued. Do you still play PokéMMO? Yes. My IGN used to be Shadowthiefdark but now it's Redacted. Your team sucks. My team could easily defeat yours. Congratulations, (insert name here). You must be the pride and joy of (insert hometown here).1 point -
Sinnoh Gym Leader Rematches
Diplomacy reacted to RedactedColour for a topic
Roark 1 Roark 2 Roark 3 Roark 4 Roark 51 point -

Ban for Porygon-Z
IcyGlacier reacted to RysPicz for a question
Eh okay, I'll do it for you once. Porygon-Z in OU: Nasty plot Set along with Tri-attack makes you pick only 2 more moves, since STAB Tri attack even after +2 doesn't do much to Tyranitar, which is one of most common OU pokes currently. So you need HP Fighting (which also gives coverage over things like Ferrothorn) and you're left with one last move which has to be either Shadow Ball or Dark Pulse, because otherwise ghosts will ruin your party. Let's then keep the set this way: Nasty Plot, Tri Attack, Dark Pulse, HP fighting. Blobs outstall you, completely. Conkeldurr, which is the most common OU, kills you with a mere Mach Punch. Scizor deals severe damage with Bullet Punch. Volcarona, Hydreigon, Mienshao, Haxorus, Starmie, Gengar, Jolteon, Salamence and every scarf user outspeeds and either outright KO or deal enough damage that you just die to orb recoil or residual damage. Pory-Z is vulnerable to all forms of hazards. Tyranitar lol. You need to be +2 and you need to predict TTar switching in to actually do something to it. Metagross tanks even +2 orbed Dark Pulse and counters back with either STAB meteor or kills right away with Hammer Arm. OU is priority heavy- Arcanine, Kabutops, Dragonite, Scizor, Conk, Lucario, Bisharp, Mamoswine, Breloom... It's so easy to revenge kill Summarizing: Taken into consideration all the traits listed (cannot break common walls, gets outspeeded by a huge lot of top OU threats, vulnerable to any kind of priority, a lot of pokes can even tank a +2 attack from it) Porygon-Z despite being good on paper is pretty much shit in our meta, which is reflected by it's usage: And next time take that kind of posts to competition alley.1 point -
*Updated* All TM and HM Locations for all regions!
White reacted to Bestfriends for a topic
Kanto (Thank you Noad for getting TMs 1 - 41 done for Kanto) Please hover your mouse over the TM in game for a description of it. TM - Electro Ball Location: Silph Co 5F - need Card Key Screenshot: http://i.imgur.com/Ekgvln6.png TM - Aura Sphere Location: Victory Road Screenshot: https://i.gyazo.com/3c8b741aadfdb910b50e43d8845189bd.png TM - Water Pulse Location: Cerulean Gym - given to you by Misty when you defeat her Screenshot: http://i.imgur.com/8uKoHxj.png TM - Calm Mind Location: Saffron Gym- given to you by Sabrina when you defeat her Screenshot: http://i.imgur.com/GBuIvMZ.png TM - Mega Drain Location: Route 4 Screenshot: https://i.imgur.com/JyToOfI.png TM - Toxic Location: Fuchsia Gym- given to you by Koga after you defeat him Screenshot: http://i.imgur.com/1cXjGEm.png TM - Hyper Beam Location: Victory Road Screenshot: https://i.gyazo.com/6bb8941ac99f8ab39d370c43cfa84256.png TM - Imprison Location: Silph Co 7F Screenshot: http://i.imgur.com/tP1rcC2.png TM - Water Gun Location: Mt Moon Screenshot: https://i.imgur.com/ZJc4jvT.png TM - Hidden Power Location: Celadon Game Corner; Island 7 Mart Screenshot: https://gyazo.com/9bfdba44e851e6b59605b14ffd779109 TM - Natural Power Location: Safari Zone Screenshot: https://i.gyazo.com/f2dd3794278dc04d7d567374bf557691.png TM - Snarl Location: Celadon Rocket Hideout (Floor 2B) Screenshot: https://i.gyazo.com/7beb0b5b0de210b474d395e0dcaf9d09.png TM - Ice Beam Location: Celadon Game Corner Screenshot: https://i.gyazo.com/2e61b3da050df17b0bbf8446bac0982d.png TM - Blizzard Location: Cinnabar Mansion Screenshot: http://i.imgur.com/8pav3JK.png TM - Hyper Beam Location: Saffron City Mart Screenshot: https://i.gyazo.com/1c2b164f4ad7ac4277c9a985a6b2c12a.png TM - Light Screen Location: Celadon Department Store roof- give the girl a Fresh Water from the venders. Screenshot: http://i.imgur.com/JtVXMl9.png TM - Agility Location: Power Plant Screenshot: https://i.gyazo.com/0eccd78e697cefbcdd2563d894843de9.png TM - Whirlwind Location: Route 15 Screenshot: https://i.imgur.com/HDKftnP.png TM - Giga Drain Location: Celadon Gym - given to you by Erika when you defeat her. Screenshot: http://i.imgur.com/YPE6e5b.png ; TM - Safeguard Location: Celadon Department Store roof- give the girl a Soda Pop from the vending machine. Screenshot: http://i.imgur.com/JtVXMl9.png TM - Fake Tears Location: Celadon Rocket Hideout (Floor 3B) Screenshot: https://i.gyazo.com/01c7b0edfddbf111081a789b409209b0.png TM - Solarbeam Location: Cinnabar Mansion Screenshot: http://i.imgur.com/N23SyVc.png TM - Iron Tail Location: Celadon Dept Store Screenshot: https://gyazo.com/6161858a454a02c0981a6ad50b0a711c TM - Thunderbolt Location: Celadon Game Corner Screenshot: https://i.gyazo.com/0d7ff0b493078b0407608b41673ba5dc.png TM - Thunder Location: Power Plant Screenshot: https://i.gyazo.com/0eccd78e697cefbcdd2563d894843de9.png TM - Earthquake Location: Viridian City Gym - defeat leader Giovanni and he will give it to you Screenshot: http://i.imgur.com/nsDcM0E.png TM - Return Location: Route 12 Screenshot: https://i.gyazo.com/d0aabc9e3fd1d7e56a4eb4a761a2bdb8.png TM - Dig Location: Cerulean City Screenshot: http://i.imgur.com/NdcqInf.png TM - Psychic Location: Saffron City- visit Mr Psychic's house Screenshot: http://i.imgur.com/sgo2ZuF.png TM - Shadow Ball Location: Cinnabar Island Mart Screenshot: https://gyazo.com/55061945d049710394756c8683231e03 TM - Submission Location: SS Anne Detail: It is in the 6th room on the main floor of the ship. TM - Screech Location: Safari Zone Screenshot: https://i.gyazo.com/e7a7d2073f103bd5900351f8c654ce9b.png TM - Reflect Location: Celadon Department Store roof - give the girl a Lemonade from the vending machine Screenshot: http://i.imgur.com/JtVXMl9.png TM - Shock Wave Location: Vermilion City gym- given to you by LT.Surge when you defeat him Screenshot: http://i.imgur.com/S314gEq.png TM - Flamethrower Location: Celadon Game Corner Screenshot: https://gyazo.com/3342a1bed24a2f6e3da3693830113442 TM - Toxic Spikes Location: Team Rocket Headquarters Island 5 Screenshot: https://i.gyazo.com/995ea882afb933eabc66cc10202fafbd.png TM - Focus Blast Location: Victory Road Screenshot: https://gyazo.com/aca7b3ff605e7a65b39de1e59d019f31 TM - Fire Blast Location: Cinnabar City gym- defeat Gym Leader Blaine and he will give it to you Screenshot: https://i.gyazo.com/08908e6dff8239e1b329fd0f7282746d.png TM - Rock Tomb Location: Pewter City gym- defeat Gym Leader Brock and he will give it to you; Pewter City Mart Screenshot: https://i.gyazo.com/7422b450c183f3ea223e2b33a62a3776.png TM - Take Down Location: Route 9 Screenshot: https://gyazo.com/111d2189d1272c1ebd0d6b729942dd3f TM - Torment Location: Silph Co (4F) Screenshot: https://gyazo.com/01763c9739cd463cbb9408ea91fe4522 TM - Baton Pass Location: Get the lemonade from Celadon Mart's vending machine and place lemonade on Steelix's Grave at Island 5's Memorial Pillar. Screenshot: https://embed.gyazo.com/55798bdbff374f9ab8ded893d5b64f73.png TM - Secret Power Location: Celadon Department Store Screenshot: https://gyazo.com/dc89e6f97c4d9f0ed4181d6f06ccc4fd TM - Pay Day Location: SS Anne (watch video) Video of Pay Day (instead of Rest): https://www.youtube.com/watch?v=9Ez4YhLO5EQ TM - Beat Up Location: Route 24 Screenshot: https://i.gyazo.com/3c30167628b8d952a796b670517bb47f.png TM - Assurance Location: Mt. Moon Screenshot: https://i.gyazo.com/a6c1529594dc675f4e7ec2af94b9ab4f.png TM - Egg Bomb Location: Safari Zone Screenshot: https://i.gyazo.com/34cb89c82646f084794ad7f815522df7.png TM - Psywave Location: Route 12 Screenshot: https://gyazo.com/dcc31f87ee9c2626af4b7c4c1b140ca4 TM - Snatch Location: Team Rocket Hideout Screenshot: https://gyazo.com/e53c005b371e9e9145783e265d0a9f5b TM - Overheat Location: Victory Road Screenshot: https://gyazo.com/ce5c469d8258f389955ce44b65051f79 TM - Teleport Location: Route 25 Description: Go east of the Route and use cut. Once there, you can obtain this TM. TM - Dream Eater Location: Man left of Viridian City's Pokemon Center (Cut or Surf is needed) Screenshot: https://i.imgur.com/uFeQB0h.png TM - Seismic Toss Location: Pewter City Museum Screenshot: https://i.imgur.com/8bHasf2.png TM - Mega Punch and Mega Kick Location: Route 4 Screenshot: https://i.imgur.com/gVx59UC.png TM - Rock Slide Location: Rock Tunnel Video: https://youtu.be/j9672bI6EA4 TM - Counter Location: Celadon Dept Store (3rd Floor) Screenshot: https://i.imgur.com/e0ASRVB.png TM - Softboiled Location: Celadon City Screenshot: https://i.imgur.com/5m4LmNe.png TM - Mimic Location: Saffron City Screenshot: https://i.imgur.com/mdxtGhU.png TM - Thunder Wave Location: Silph Co (2nd Floor) Screenshot: https://i.imgur.com/nq8P51Q.png TM - Substitute Location: Futchia City Screenshot: https://i.imgur.com/VKuAL1e.png TM - Metronome Location: Cinnabar Island's Laboratory Screenshot: https://i.imgur.com/v6RtdSu.png TM - Double-Edge Location: Victory Road Screenshot: https://i.imgur.com/795XuXN.png TM - Explosion Location: Mt Ember Screenshot: https://i.imgur.com/4CXLTrG.png TM - Swords Dance Location: Island 7 Screenshot: https://i.imgur.com/1L9iVPW.png TM - Body Slam Location: Island 4 Screenshot: https://i.imgur.com/BQQ0XhD.png Hoenn Please hover your mouse over the TM in game for a description of it. TM - Hurricane Location: Route 115 Screenshot: https://i.imgur.com/AcdXq3w.png TM - Dragon Claw Location: Meteor Falls Screenshot: https://gyazo.com/dce38545cfd14fbac86ae50473a1120d TM - Water Pulse Location: Sootopolis City Gym Screenshot: https://gyazo.com/c1aab99509413761df809c53c422dd9f TM - Calm Mind Location: Mossdeep City Gym Screenshot: https://i.gyazo.com/f4e328da6ed072f9ecc4ddecda894efd.png TM - Roar Location: Route 114 Screenshot: https://i.gyazo.com/304362fcf9c60d2f950eb7f576988a2b.png TM - Toxic Location: Fiery Path Screenshot: https://gyazo.com/b86473919f4473b114633a6e8cf6cb4c TM - Snowscape Location: Shoal Cave (Low Tide) Screenshot: https://gyazo.com/cb4eda6fcd9f6c295a12d70cf14e4de2 TM - Bulk Up Location: Dewford Town Gym Screenshot: https://i.gyazo.com/d5bf60210b344547ad97a8494c1db88b.png TM - Bullet Seed Location: Route 104 Screenshot: https://gyazo.com/c748de517b3c09fa762229f7fbc3e8c2 TM - Hidden Power Location: Fortree City Screenshot: https://gyazo.com/1281296c9732f0efbcca5ff300abcff4 TM - Sunny Day Location: Scorched Slab Screenshot: https://gyazo.com/b61fee3de333b470358bcfac69921465 TM - Taunt Location: Fortree City Mart Screenshot: https://i.gyazo.com/6b6f1e461496271065d7086faf972e9a.png TM - Ice Beam Location: Abandoned Ship (storage key needed) Screenshot: https://gyazo.com/e672123219b3b65445165b564769f6fc TM - Blizzard Location: Sootopolis City Mart Screenshot: https://i.gyazo.com/7f41a449c80a8443bdb2b6ed9bc5d518.png TM - Hyper Beam Location: Fortree City Mart Screenshot: https://i.gyazo.com/60eb9e95447128670a35a6baf685e91b.png TM - Light Screen Location: Sootopolis City Mart Screenshot: https://i.gyazo.com/51aab0d786b65984ae63a0b6b0aed951.png TM - Protect Location: Slateport City Mart Screenshot: https://i.gyazo.com/20dfb64131d28901bc523b391f09c4a0.png TM - Rain Dance Location: Abandoned Ship Screenshot: https://gyazo.com/17ef8e38711a374a4f4a70347cf825ff TM - Giga Drain Location: Route 123 and talk to the lady that Bloodyroar is staring at. (Important: make sure to bring a grass type pokemon before talking to her) Screenshot: https://gyazo.com/43bd7da93157cb3845b4bf2dbe6442df TM - Safeguard Location: Slateport City Mart Screenshot: https://i.gyazo.com/aab8583377b6ea1295c0fd4d95a3824b.png TM - Frustration Location: Pacifidlog Town Screenshot: https://gyazo.com/4781daa867b6317de13a1ba490aec06c TM - Solarbeam Location: Safari Zone Screenshot: https://i.gyazo.com/d78b2585c28dd5eb9be136a8534e253f.png TM - Fissure Location: Meteor Falls Screenshot: https://gyazo.com/fb9773a72206abc3c19b4d63a6dd3b22 TM - Thunderbolt Location: New Mauville Screenshot: 1st step ; 2nd step (Thank you Forfiter for the assistance for Thunderbolt and Double Team) TM - Thunder Location: Sootopolis City Mart Screenshot: https://i.gyazo.com/b5d6b93902a10e1e93daec4dbf4a3178.png TM - Weather Ball Location: Seafloor Cavern Screenshot: https://i.gyazo.com/6c8adaab6ae098f71dc78e9b2c785258.png TM - Return Location: Pacifidlog Town Screenshot: https://gyazo.com/4781daa867b6317de13a1ba490aec06c TM - Dig Location: Route 114 Screenshot: https://gyazo.com/991d8beeb7b4eacd5fcc2d4ab191bb17 TM - Psychic Location: Victory Road Video: https://youtu.be/FFXt3LKwMXI TM - Hex Location: Mt. Pyre (6th floor) Screenshot: https://i.gyazo.com/2076d1b4caf03addaab012a4e7958ab1.png TM - Brick Break Location: Sootpolis City Screenshot: https://gyazo.com/bb60bbde5f5c96c72c2e06fac532a837 TM - Double Team Location: Route 113 Screenshot: http://i.gyazo.com/5d3a3afb5a6483e5cea4c4f3992cfbb9.png (Thank you Forfiter for the assistance for Thunderbolt and Double Team) TM - Reflect Location: Sootopolis City Mart Screenshot: https://i.gyazo.com/a7786005cae84cf0670df6322f36b039.png TM - Shock Wave Location: Mauville City Gym Screenshot: https://i.gyazo.com/e6b1dd7462e112c9e6897664914e64a3.png TM - Flamethrower Location: Sootopolis City Mart Screenshot: https://i.gyazo.com/a024857180506abbae61dc1d5e3174c7.png TM - Sludge Bomb Location: Sootopolis City Mart Screenshot: https://i.gyazo.com/4c88c060643a01a641d1fc5d31d509ce.png TM - Sandstorm Location: Route 111 Screenshot: https://gyazo.com/945b45611a3f5a1c072130bab6dc2ad5 TM - Fire Blast Location: Sootopolis City Mart Screenshot: https://gyazo.com/8757d8c2012af40c4fcd4e1f01dbdf55 TM - Rock Tomb Location: Rustboro City Gym Screenshot: https://gyazo.com/1ae1fc594cb95ea28fbdf123bf6faa8e TM - Aerial Ace Location: Fortree City Gym Screenshot: https://i.gyazo.com/d98acb9f3d54193a615b0e29d93bc873.png TM - Torment Location: Slateport City Screenshot: https://gyazo.com/16c3082ffb0b1b72c2a6b1517883d368 TM - Facade Location: Petalburg City Gym Screenshot: https://i.gyazo.com/1b2dc274b488b82d41107ca304167760.png TM - Secret Power Location: Slateport City / Route 111 Screenshot: https://gyazo.com/b5c51139a4c42ecd26a17d888dc1bc99 ; https://gyazo.com/d4d7baf2883a938ebca8c4313cc0facf TM - Rest Location: Lilycove City (go to the house circled in red and talk to the man) Screenshot: https://gyazo.com/fe75a1bd041883b9c6721be2f6a41e3c TM - Charm Location: Verdanturf Town Screenshot: https://gyazo.com/9156d97d04b8757bbd9ab9edbbddbeca TM - Thief Location: Slateport City Museum (talk to the Team Aqua Grunt) Screenshot: https://gyazo.com/86d0e7a173d3da843410e014a3a25ae6 TM - Steel Wing Location: Granite Cave (in Dewford Town) - Chat with Steven to receive this TM Screenshot: https://gyazo.com/a36fc376492f064e0eb444783b4f80e3 TM - Guard Swap Location: Mt. Pyre Screenshot: https://gyazo.com/05dcca2f6f284a5a49f0239f2ae3d065 TM - Snatch Location: S.S. Tidal Watch this Video: https://www.youtube.com/watch?v=KxdE9gGQyH4 TM - Overheat Location: Lavaridge Town Gym Screenshot: https://i.gyazo.com/e0fa990b8e209dae41fb3ffcd713a743.png TM - Natural Gift Location: Pacifidlog Town Screenshot: https://i.gyazo.com/f7bcb3ccc10ac4f88457a65f55bfc4ec.png TM - Double-Edge Location: Sootopolis City Screenshot: https://i.imgur.com/PIwlhqV.png TM - DynamicPunch Location: Mossdeep City Screenshot: https://i.imgur.com/MvrivYT.png TM - Explosion Location: Pacifidlog Town Screenshot: https://i.imgur.com/urLbY7E.png TM - Fury Cutter Location: Verdanturf Town Screenshot: https://i.imgur.com/6kRNkly.png TM - Metronome Location: Fallarbor Town Screenshot: https://i.imgur.com/3wNkYsQ.png TM - Mimic Location: Lavaridge Town Screenshot: https://i.imgur.com/xA66IZj.png TM - Rollout Location: Mauville City Screenshot: https://i.imgur.com/cjpp1ge.png TM - Sleep Talk Location: Fortree Town Screenshot: https://i.imgur.com/JqiNaEq.png TM - Substitute Location: Lilycove City Department Store's Top Floor Screenshot: https://i.imgur.com/hOKanev.png TM - Swagger Location: Slateport City's Pokemon Fan Club Screenshot: https://i.imgur.com/otEdifA.png1 point